Using a modem and a telephone line
to establish remote access
is achieved by programing a modem for use at the home base, programing a modem for the ground vibration monitor at the remote location, configuring the ground vibration monitor for remote access, making the final connections, and finally testing the system.
While other equivalents may function the following list of equipment has been tested:
Two U. S. Robotics Sportster 5686-03 modems.
One Minimate Plus or Blastmate III with a serial number greater than 6000.
BlastWare III software (Version 4.0 or greater).
For the remote an Instantel Null Modem Cable 714A7501 or an Instantel Standard download cable connected with a Belkin Serial Cable (F2L044 or F2L088) using a 9 pin gender changer.
For the local home base a Belkin Serial Cable F2L088.
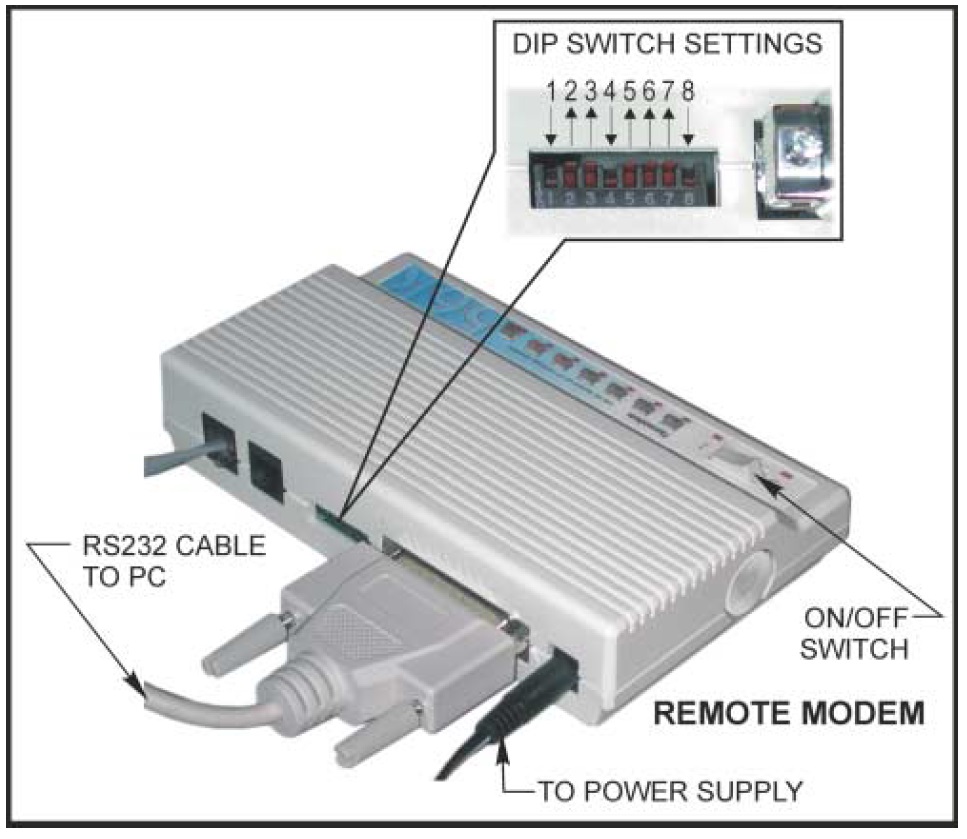
To program or initialize a modem for use at a remote location
label one modem as remote, for future identification. Set the dip switches on the remote modem as shown in the figure. These settings are different than the settings used for the local home base modem.
Per the manufactures recommendations, power on the remote modem and connect the modem to either a 9 pin COM port or USB adaptor on the local home PC using the Belkin Serial Cable F2L088. There are a wide variety of USB adapters. A previous lesson is provided on installing a USB adapter and/or troubleshooting connection issues. Start Blastware. If changes in Blastware menu items do not save, try starting Blastware using administration privileges in Windows. Confirm Blastware is configured for the correct series of ground vibration monitors, in this case Series III under Unit/Select Unit Type. In order to communicate with the modem, the Unit/Communications menu should be setup as shown in the following figure, with the Port matching the COM port on the PC. Here the modem is connected to COM1. If using a USB adapter, the Port will need to match the COM port the USB adapter was configured as when it was installed (once again, check the lesson on USB adapters for assistance in identifying the correct COM port to use). Other baud rates can be used, however 9600 baud often provides the most stable transfer rates.
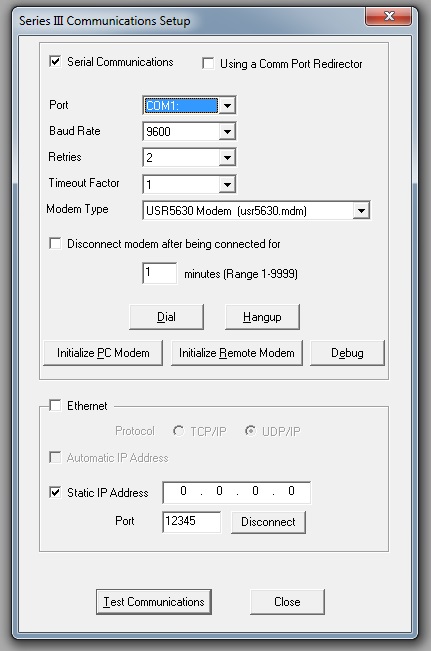
Click on the “Initialize Remote Modem” button. An information box should pop up showing the progress. If the above instructions are not followed, a message will appear indicating that “Modem not responding.” Otherwise, the modem should now be configured and ready to use at a remote location with a Minimate Plus or Blastmate III.
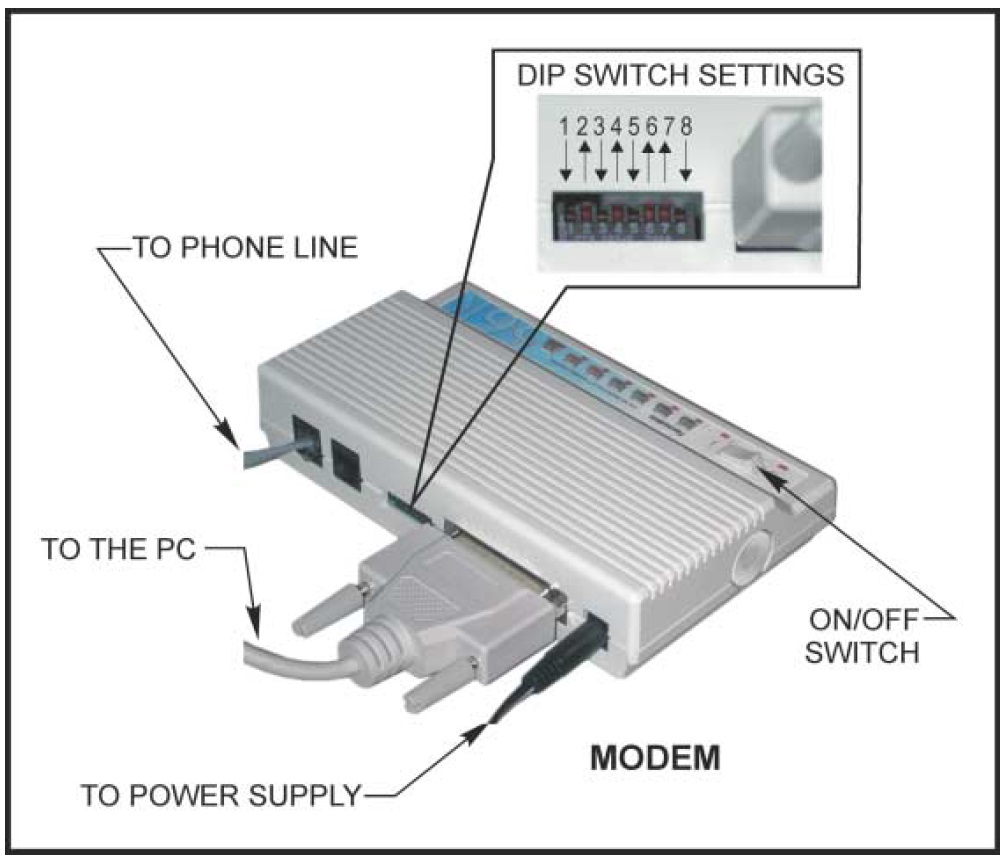
To program or initialize a modem for use at a local home base location
label the remaining modem as local or home, for future identification. Set the dip switches on the local or home modem as shown in the figure. These settings are different than the settings used for the remote modem.
Per the manufactures recommendations, power on the local or home modem and connect the modem to either a 9 pin COM port or USB adaptor on the local home PC using the Belkin Serial Cable F2L088. As previously discussed, there are a wide variety of USB adapters and a lesson is provided on installing a USB adapter and/or troubleshooting connection issues. Start Blastware. If changes in Blastware menu items do not save, try starting Blastware using administration privileges in Windows. Confirm Blastware is configured for the correct series of ground vibration monitors, in this case Series III under Unit/Select Unit Type. In order to communicate with the modem, the Unit/Communications menu should be setup as shown in the following figure, with the Port matching the COM port on the PC. Here the modem is connected to COM12 using a USB adapter. Again, other baud rates can be used, however 9600 baud often provides the most stable transfer rates.

Click on the “Initialize PC Modem” button. An information box should pop up showing the progress. If the above instructions are not followed, a message will appear indicating that “Modem not responding.” Otherwise, the modem should now be configured and ready to use at a local or home location to access a Minimate Plus or Blastmate III.
Setup A Minimate Plus or Blastmate III to communicate with the remote modem
The above initialized the local home modem and the remote modem for transferring data over a telephone line. Next the ground vibration monitor needs to be configured to operate with the configured remote modem.
To configure a Minimate Plus simultaneously push the → with the SETUPS button. The display should show “Timer Mode:” Press the *ENTER key 11 times until the display window shows “Serial Connection:” Press the UP Arrow key until the display shows “Via Modem.” Press the *Enter key to select this choice. In the future, this option will need to be changed back to “Direct” in order to connect directly to a PC at the office or home base. Press the *Enter key again and the “Modem BAud Rate:” menu appears. Use the arrow keys to enter the baud rates used during the initial programing. Generally, the baud rate is set to 9600. Press the *Enter key to save and use the CANCEL key to exit back to the main display.
To configure a Blastmate III press the SETUPS SPECIAL key. Press on the *ENTER key until the display window shows “Serial Connection:” Press the UP Arrow key until the display shows “Via Modem.” Press the *Enter key to select this choice. In the future, this option will need to be changed back to “Direct” in order to connect directly to a PC at the office or home base. Press the *Enter key again and the “Modem BAud Rate:” menu appears. Use the arrow keys to enter the baud rates used during the initial programing. Generally, the baud rate is set to 9600. Press the *Enter key to save and use the CANCEL key to exit back to the main display.
Final Cable Connections and Testing
Before going to the field, it is important to confirm that the entire system is configured properly and capable of funcitioning as expected. Two direct connect telephone lines are needed, with separate telephone numbers. Per the manufactures recommendations, plug in one of the two telephone lines, power on the modem, and connect the ground vibration monitor to the remote modem with an Instantel Null Modem Cable 714A7501 or an Instantel Standard download cable using a Belkin Serial Cable (F2L044 or F2L088) and a 9 pin gender changer. Repeat the procedure using the second telephone line and a Belkin Serial Cable F2L088 to connect to the local home base PC or laptop to the local modem. Like before, go to Unit/Communications in Blastware. The following menu should appear. Confirm that the Port, Baud Rate, and other settings are appropriate for the local modem. Below is using a USB adapter configured as COM12.
Click on the “Dial” button shown in the above figure and the modem dial list will appear, shown below. Create a location to dial by editing one of the lines showing “Name?.” Edit as necessary by entering a name for the location, its telephone number (add area code or other keystrokes necessary to dial the number you with to call), and declare what baud rate the remote unit is configured to connect. Close the edit menu by clicking on the OK button. The menu will close.
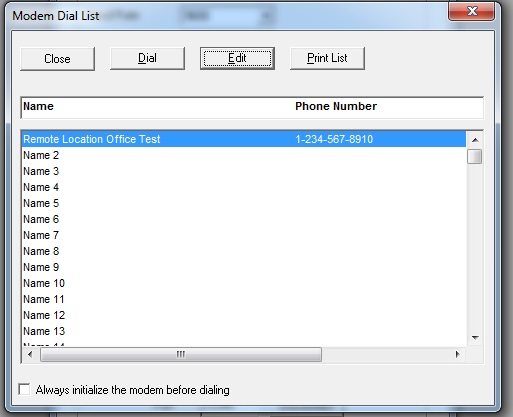
If everything is in order, click on the “Dial” button shown on the Modem Dail List. A dial tone will be heard followed by the sounds of a touch tone keypad. As shown below, a window will open displaying the number that is being dialed and the baud rate Blastware will attempt to connect at. Repeat, after waiting a minute or two, if the connection is not completed as expected.

Shortly, Blastware should display another box “The modem is connected at xxxxx baud.” Click OK and the information box will close. Close the “Modem Dial List” box. The communication setup menu should not be covered by any other windows. Click on the “Test Communications” button. Another popup window will appear displaying that Blastware is attempting to communicate with the ground vibration monitor that is connected to the remote modem. If successfully connected to the remote ground vibration monitor, Blastware will display a message saying “Communications OK” and display the SN of the monitor the modem is connected to.

Return to Blastware’s main menu after closing any open menus, by clicking on the cancel buttons. At this point, one can access the ground vibration monitor as if it was connected directly to the local home based PC or laptop. However, beware that the transfer time or lag time between commands can take a minute or two to perform. Unlike the 38,000 baud rate that is commonly used for connecting directly to the ground vibration monitor in the office, 9600 is about one forth the speed. For example, go to Unit/Setup/Compliance Setup in Blastware. After several information boxes open and close, the compliance report menu appears. This menu will display in the top bar that it is connected to a ground vibration monitor and will display in lower right hand corner the version of the operating system that is being used. This process will likely take well over a minute to complete.
It is important to remember to disconnect from the ground vibration monitor, after completing any necessary tasks. Go to Unit/Communications and click on the “Hangup” button to disconnect. When accessing the remote monitor in the field, do not forget to return the system back into monitoring mode, by clicking on Unit/Monitor and the “Start Monitoring” button. This is a common mistake.