

1) View Events:
Shortcut: ↑
You can view MiniMate Plus events stored in the internal memory.
From the Main window, press the ↑ key to display the View Events window. This window indicates the total number of events stored in the MiniMate Plus. Press the Enter key to enter the View window. Press the ↑ key to scroll through the events beginning with the most recently recorded event. Press the → key to scroll through the events beginning with the event with the earliest record date and time.
By default, event data appears in the following order. If you viewed event data before, the data last displayed when you stopped viewing events appears first the next time you view events. Channels 5, 6, 7, and 8 require an eight channel monitor.
1. Peak Particle Velocity (PPV) and Air Pressure.

2. Velocity or air pressure results along with the frequency for all channels, displayed in pairs, beginning with channels 1 and 2. For advanced events, the velocity result appears only. Frequency is not calculated for advanced events.

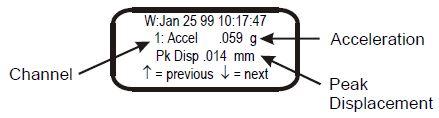
3. Acceleration and peak displacement results for each channel displayed individually.
4. Peak vector sum results for channels 1, 2, 3 and channels 5, 6, 7 (eight channel monitor required).

5. Peak Particle Velocity for all enabled channels expressed in decibels, and Air Pressure. (Units with a serial number of 6000 or higher only.)

2) Delete All Events:
Shortcut: ↑ x 2
Deleting all the MiniMate Plus events stored in the internal memory frees up space in order to record additional events. WARNING: Once the events have been deleted, they cannot be recovered.
To delete all the events in the MiniMate Plus, press the ↑ key with the Main window displayed, until the Delete All Events window appears. This window indicates the total number of events stored in the MiniMate Plus. Press the Enter key to begin the deletion. A second window appears asking you to hold the Enter key for five seconds to delete all files. This window asks you to confirm your initial choice or leave the window without continuing. Press and hold the Enter key for five seconds to delete all events. At the bottom of the window, a countdown indicator tells you the number of events being deleted. The message “All Memory Erased. Press any key.” indicates all events have been successfully deleted from the monitor.
3) Print Event List:
Shortcut: ↑ x 3
You can print a MiniMate Plus event list indicating all the events stored in the vibration monitor along with each event’s date, time, and recording results. A printer (optional) must be connected to the MiniMate Plus.
To print a MiniMate Plus event list, press the ↑ key when the Main window is displayed, until the Print Event List window appears. Press the Enter key to print the event list.
4) Print Selected Event:
Shortcut: ↑ x 4
You can select and print specific events stored in the MiniMate Plus. A printer (optional) must be connected to the MiniMate Plus.
To print one MiniMate Plus event, press the ↑ key when the Main window is displayed, until the Print Selected Event window appears. Press the Enter key to display the most recently recorded event. Press the ↑ key or → key to scroll through the other events stored in the MiniMate Plus. To print an event, press the Enter key when it appears on the display. During printing, the event appears on the display along with the message “Printing Event”. When printing finishes, the display returns to the Event window where you can scroll through the stored events and choose another event to print, if desired.
5) Print All Events:
Shortcut: ↑ x 5
You can print an event summary report for each event stored in the MiniMate Plus. A printer (optional) must be connected to the MiniMate Plus.
To print all the events, press the ↑ key when the Main window is displayed, until the Print All Events window appears. Press the Enter key to select this choice and begin printing. During printing, the MiniMate Plus displays each event along with the total number of events to be printed. The display returns to the Print All Events window after printing finishes.
6) Upload One Event:
Shortcut: ↑ x 6
You can copy events stored in a MiniMate Plus and transfer them to a BlastMate III monitor in order to print them. MiniMate Plus events printed on a BlastMate III are identified as MiniMate Plus events on the top of the event summary report.
In order to upload events, you must first connect the MiniMate Plus to the BlastMate III Cable (716A1801 optional). Plug the BlastMate III end of the cable into the BlastMate III Aux connector and the MiniMate Plus end of the cable into the MiniMate Plus Aux connector. Check that the BlastMate III is displaying the Main window with the message “Ready to Monitor.” Set the Serial Connection to Direct and set the Baud Rate to the same rate in both monitors.
To upload one event, press the ↑ key when the Main window is displayed, until the Upload One Event window appears. Press the Enter key to select this choice. The most recently recorded event appears on the display. Press the ↑ key to display the next event or the Right Arrow to display the earliest recorded event. With the required event appearing on the MiniMate Plus display, press the Enter key to begin the uploading. The message “Uploading” along with the number of the event appears on the bottom of the MiniMate Plus display. After the event has been transferred to the BlastMate III, the message “Event Uploaded Successfully” appears momentarily on the MiniMate Plus display.
7) Upload All Events:
Shortcut: ↑ x 7
You can also copy all the events stored in a MiniMate Plus to a BlastMate III monitor in order to print. MiniMate Plus events printed on a BlastMate III are identified as MiniMate Plus events on the top of the event summary report.
In order to upload events, you must first connect the MiniMate Plus to the BlastMate III Cable (716A1801 optional). Plug the BlastMate III end of the cable into the BlastMate III Aux connector and the MiniMate Plus end of the cable into the MiniMate Plus Aux connector. Check that the BlastMate III is displaying the Main window with the message “Ready to Monitor.” Set the Serial Connection to Direct and set the Baud Rate to the same rate in both monitors.
To upload all the events, press the ↑ key when the Main window is displayed, until the Upload All Events window appears. Press the Enter key to select this choice. The message “Uploading” along with the number of each event currently being uploaded appears on the bottom of the MiniMate Plus display. After all the events have been transferred to the BlastMate III, the message “All Events Uploaded Successfully” appears momentarily on the MiniMate Plus display.
8) Copy BMIII Notes:
Shortcut: ↑ x 8
This command copies the notes from a BlastMate III to a MiniMate Plus. You require the MiniMate Plus to the BlastMate III Cable (716A1801 optional). Plug the BlastMate III end of the cable into the BlastMate III Aux connector and the MiniMate Plus end of the cable into the MiniMate Plus Aux connector. Check that the BlastMate III is displaying the Main window with the message “Ready to Monitor.” Set the Serial Connection to Direct and set the Baud Rate to the same rate in both monitors.
To copy the notes, press the ↑ key repeatedly on the MiniMate Plus until the Copy BMIII Notes window appears. Press the Enter key. The message “Copying” appears. Press the Enter key. The message “Copying” appears on the display followed by “Notes Copied Successfully” when the process completes.