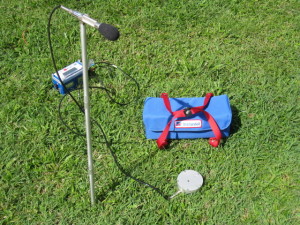
Installing the Instantel Ground Vibration Monitor Microphone
An Instantel ground vibration monitor microphone comes with a sectional three foot mounting stand. To put one together, begin by screwing the three sectional pieces together. Determine where the microphone should be positioned and firmly press the stand into the ground. Insert the microphone into the mounting bracket, pointing the microphone towards the direction of the event. If necessary, attach the windscreen to reduce false triggering caused by wind. Connect the microphone cable to the ground vibration monitor and press the Test key to check the microphone’s connection.
NOTE: The ground vibration monitor microphone windscreen attenuates the microphone reading by 0.2 dB. In most cases, this does not have a material impact on results.
Ground Vibration Monitor Microphone Type (Compliance Module Only)
The Instantel ground vibration monitor may be connected to two different microphone types: Linear “L” or ” Weight “A”. The microphone must be configured to the proper microphone type to ensure correct measurement units and data analysis. To check your microphone type, read the label on the side of the microphone identifying the model as Lin Mic for a linear microphone or A Mic for an “A” Weight microphone.
Minimate Plus :
To select a microphone type, press the → key and the Setups key together. Press the Enter key to scroll the windows until the Microphone Type window appears. Press → key to display the two microphone types, Linear or “A” Weight. To choose a setting, display it on the Microphone Type window and press the Enter key. On eight channel monitors, set the microphone type for the second microphone, Mic2.
Blastmate III:
To select a microphone type, press the Setups Special key when the Main window is displayed. Press the Enter key repeatedly to scroll through the windows until the Microphone Type window appears. Press the ↑ or ↓ key to display the two microphone types, Linear or “A” Weight. To choose a setting, display it on the BlastMate III display and press the Enter key. On eight channel monitors, set the microphone type for the second microphone, Mic2.

Ground Vibration Monitor Microphone Units (Compliance Module Only)
The measurement units used on the ground vibration monitor microphone channel depend on the microphone type and measurement system being used. For Linear “L” microphones, you have the choice between psi (L), dB (L), or pa. (L). For “A” weight microphones, units are dB (A) only. For this reason, when you chose the “A” Weight microphone type, this window does not appear on the ground vibration monitor’s display.
MiniMate Plus:
To choose the microphone measurement units, press the → key and the Setups key together. Press the Enter key to scroll the windows until the Microphone Units window appears. Press → key repeatedly to display the three choices. Press the Enter key to select a measurement unit when it appears on the display.
Blastmate III:
To choose a microphone measurement unit, press the Setups Special key when the Main window is displayed. Press the Enter key repeatedly to scroll through the windows until the Microphone Units: window appears. Press the ↑ or ↓ key to display the three microphone unit choices. Press the Enter key to select a measurement unit when it appears on the display.