Basic Setup and Testing the Blastmate III
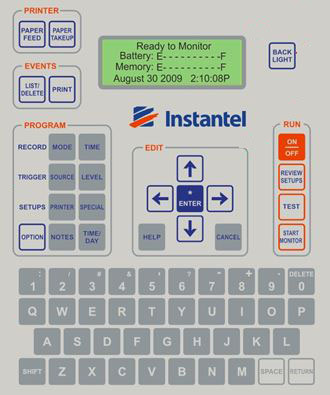
1) Confirm that the Blastmate III is charged and functional by turning on the Blastmate III. Turn it on by pressing the On/Off key until you hear a beep. If the Blastmate III does not turn on, check to see if the battery is connected. Charge the battery if needed or use the Blastmate III while it is plugged in to a wall socket. Depending on the state of the battery, charging can take 24 hours.

Briefly, the Start Up window will appear, displaying the Blastmate III’s serial number, operating software, amount of memory available, and number of stored events.

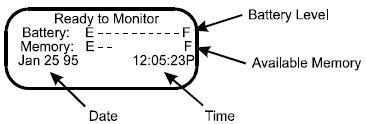
After the Start Up window disappears, the Blastmate III will display the Main window. The Main window displays the battery level, date, time, and available memory. This window will be your starting point whenever setting up the Blastmate III.

2) After confirming the Blastmate III console is operational, turn it off. If your have entered a menu, press the Cancel key to return to the Main window. Press On/Off key until the display disappears. The Blastmate III is now turned off.
3) Attach the triaxial geophone to the Blastmate III by a connecting the transducer cable to the Blastmate III’s port labeled ‘geophone.’ Likewise, connect the microphone cable to the Blastmate III’s microphone port.
4) Turn on the Blastmate III by pushing On/Off key until you hear a beep. Check your installation by running the Sensorcheck program. Before pushing the Test button, make sure the triaxial geophone is level and not upside down. The holes for the threaded spikes are on the bottom of the geophone. A large arrow is embossed in to the top of the geophone case. Press the Test button. This button tests the functionality of the transducer and microphone. It is important not to touch the Blastmate III when this function is being performed. The Sensorcheck program will let you know if all channels are working, if the microphone is On/Off, and if the Unit is Ok. If in doubt about the current settings, a good place to start is resetting the Blastmate III to its defaults.
5) Review all the Blastmate III preferences by pressing the Review Setups keys at the same time. The Blastmate III display will scroll through all of the current setups: record mode, trigger source, trigger levels, record stop mode, the time, and the date. Push the Enter key at anytime to pause and view the setups. To continue scrolling, press the Enter key again.
6) Change the Blastmate III preferences as needed. A common preference to change is the units setting, changed from Metric to Imperial.
7) Turn the Blastmate III off and install at a desired location for testing or to start monitoring.
8) Record events by pressing the Start Monitor key. Press the Cancel key to stop monitoring.
Create a test event: Start by changing the settings. Set the record time to a Continuous, Fixed, record time of two seconds. Change the Geo trigger level to 0.07 in/s and the Linear Mic trigger level to 100 dB.
Press the Start Monitor key. To see an event being recorded, clap your hands once in front of the microphone. The Blastmate III beeps indicate an event’s activity has exceeded the trigger level and the event’s results appear on the display. The Blastmate III then returns to the monitoring mode ready to record another event. Now bump the geophone the transducer. Again, the BlastMate III beeps. The results appear on the display and the Blastmate III returns to the monitoring mode. Press the Cancel key to stop monitoring. We have just recorded two events and stored them in the Blastmate III memory.
9) View the events recorded. From the Main window, press the List/Delete key to display the View Events window. Next use the Press the Enter key to view the most recently recorded event. Next, press the ↑ or ↓ key to view the other event we recorded caused by clapping our hands in front of the microphone. After testing it may be a good idea to reset the console to its default settings.
10) Turn off the Blastmate III. Press the Cancel key to return to the Main window. Push the On/Off key until the displays disappears. The Blastmate III is now turned off.