Auto Call Home downloads event data
to a local home based PC or laptop
after remote access has been configured. This method of transferring event data can be configured to clear the memory of a ground vibration monitor. Take note that the ground vibration monitor can be setup to call almost any telephone number, based on the Auto Call Home configuration. If this feature is not used to transfer data, events will not be transferred to a local PC and/or the memory of the ground vibration monitor will not be cleared for additional records. The necessary equipment and the initialization process for remote access is covered in the lesson on Remote Access – Modem and Telephone Lines. The following lesson assumes the operator knows how to connect to a ground vibration monitor using remote access.
First setup is to connect to the remote ground vibration monitor.
This can be completed either by connecting the ground vibration monitor directly to a PC or laptop or through remote access. In either case, the operator needs to start Blastware (run Blastware with Administrative privileges if setups are revert back to previous settings) and open the menu Unit/Communications. Connect to the ground vibration monitor using the perfered method of communication. Use the “Test Communications” button to confirm that the computer and the ground vibration monitor are communicating. If Blastware fails to connect to the ground vibration monitor, you may need to review the remote access settings.
Second configure the ground vibration monitor for Auto Call Home.
While staying connected, close the communications window and open the Remote Access/Auto Call Home/Setup Unit menu, shown below. If using a telephone line, this may take a minute or two because 9600 baud can be slow at times.
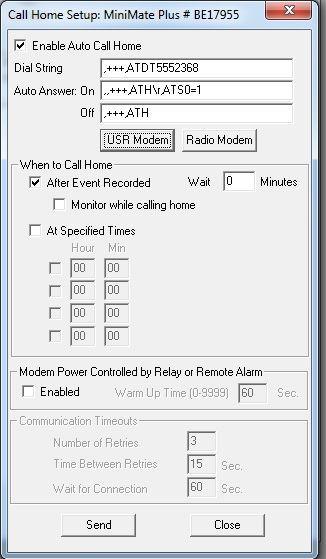
Since this lesson is about using a U.S Robotics modem, click on the USR modem button, which auto fills the Auto Answer commands. Make sure the Enable Auto Call Home box is checked. Next, enter the telephone number used to call the local home base PC or laptop. This number is usually a sting of 7 to 11 digits that follow the letters “ATDT”. An example telephone number (555-2368) is shown. It needs to be replaced. The other options can be set as needed. When ready to configure the remote ground vibration monitor, click on the Send button followed by the OK button. This may take a minute or two when using a telephone line connection. When the process is completed the Call Home Setup box will close and return the operator to the main Blastware menu.
Test the ground vibration monitor to confirm it Auto Calls
using the “Call Home Test” menu on the ground vibration monitor. This this feature found by scrolling through the menu items shown under the →+Setup keys on a Minimate or by pressing the “Special Setup” key on a Blastmate III. Scroll through using the *Enter key. After the “Call Home Test” is enabled, the ground vibration monitor will call the telephone number entered in the Call Home Setup menu. Unless the PC or laptop has been configured to auto answer the telephone will only ring. Stop the test using the Cancel button on the ground vibration monitor. It is very important to test all features before going to the field.
Setup up Auto Call Home on the local home based PC or laptop
to accept a call from a ground vibration monitor. The easiest way to the setup menu, shown below, is via Remote Access/Auto Call Home/Setup PC. The longer path to open the Auto Call Home PC Setup menu is by Remote Access/Auto Call Home/Start/Settings/PC Setup.
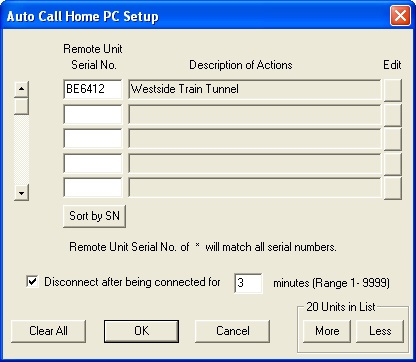
This menu determines which remote ground vibration monitors will be downloaded and how they will be treated during an Auto Call Home event.
You must tell Blastware which monitors to expect modem communications from. When the monitor phones in, the software checks the monitor’s serial number against the settings contained in the Auto Call Home PC Setup dialog box. If it finds a match, it executes the instructions you have specified.
Enter the remote Blastmate III or Minimate Plus Unit’s Serial No. (not the serial number of the geophone or microphone) for the Auto Call Home feature. Click on the Edit button to set the actions (see below).
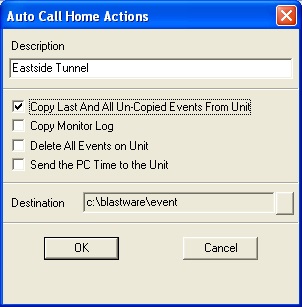
Blastware applies these actions to any monitor that calls in. As a reminder, Auto Call Home is supported by Blastmate III or Minimate Plus units with a serial number of 6000 or greater, or any Series IV unit. After the edit button is clicked on the description can be edited. Enter the description you wish to associate with this monitor. The description allows you to identify the monitor in a way that is meaningful to you. After entering the description determine which options are needed: a) Copy Last and All Un-Copied Events From Unit, b) Copy Monitor Log, c) Delete All Events on Unit (Warning: If you select Delete All Events on Unit without also selecting Copy Last And All Un-Copied Events From Unit, you may delete Events that you have not yet copied to your PC. This option is not available if the unit is set to Histogram Combo Recording Mode.), d) Send the PC Time to the Unit (This option is not available if the unit is set to Histogram Combo Recording Mode.), and e) the destination where event data will be stored. Other options on the main menu include “Disconnect after being connected for ‘x’ minutes (Range 1-9999).” (Make sure that the timeout is long enough to allow all Events to download. For example, a 1- second 4-channel Event recorded at 1024 sps takes about 1 minute to transfer using a typical modem connection. For Series IV units, ensure that the range is set to handle extremely large Events or thousands of stored Events. Click “OK” to accept changes or “Cancel” to leave without making changes.
Auto Call Home must be enabled or started before it will answer incoming calls.
Before connecting or starting Auto Call Home, confirm the COM ports Auto Call Home will monitor. In the menu Remote Access/Auto Call Home/Start/Settings the operator selects the COM ports and the communications baud rate.
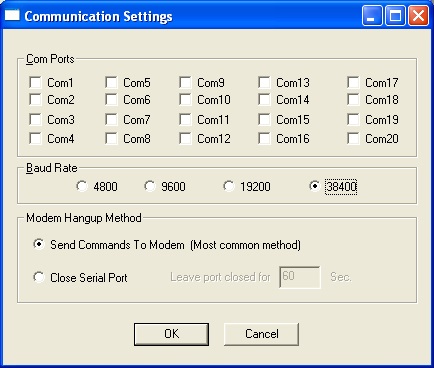
Over a telephone line, 9600 baud is often used, even though it is slower. Remember, the baud rate selection here must match the baud rate that was selected on the ground vibration monitor through its keypads.
To enable or start the Auto Call Home services open the menu Remote Access/Auto Call Home/ Start. You must select Connect and have this window open any time that you want the software to monitor particular COM Ports for incoming calls.
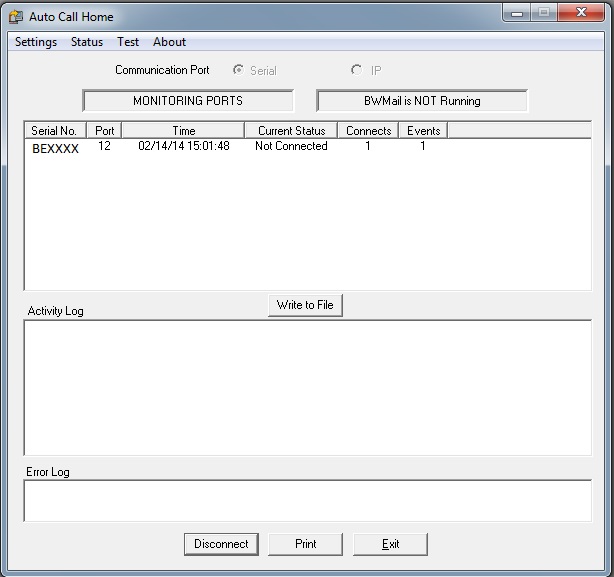
To stop monitoring the serial ports click on Disconnect, or Exit to disconnect and return to the main Blastware window. Note: Blastware Mail and Auto Call Home can not share the same communications serial port.
Make sure you test your setups and connections before going to the field. At this point, if Auto Call Home is connected test the feature out by creating an event on the ground vibration monitor, which is connected to another telephone line, and confirm it calls in and downloads as expected.