MiniMate Plus Record Modes:

1) Single Shot Record Mode:
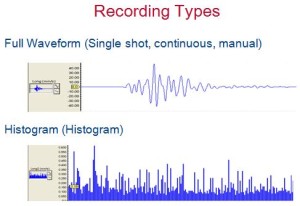
The single shot record mode is used to record one event automatically. Once an event’s ground vibrations or air pressure exceeds the trigger level, the MiniMate Plus records the event, displays the results, and stops monitoring. The event is recorded as a group of waveforms, based on the operator’s setup of the Minimate Plus.
2) Continuous Record Mode:
The continuous record mode is used to record multiple events automatically. The event is recorded as a group of waveforms, based on the operator’s setup of the Minimate Plus. Anytime an event’s ground vibrations or air pressure exceeds the trigger level, the MiniMate Plus records the events, displays the results, and continues to record any following event.
3) Manual Record Mode:
The manual record mode is used to record events when automatic triggers are unreliable due to excessive wind, nearby vehicle activity, or to background noise in the vicinity of a site. In this case, the Start Monitor key must be pressed by the operator. The event is recorded as a group of waveforms, based on the operator’s setup of the Minimate Plus.
4) Histogram (Strip chart) Record Mode:
The histogram record mode is used to record events over a long period of time (such as monitoring pile driving operations.) The mode operates with both four and eight channel monitors. Four channel histogram events can be printed by the monitor using an optional printer while eight channel events must use the BlastWare III software program.
In this mode, an event is NOT recorded as a group of waveforms. Instead, the MiniMate Plus stores summary event information (based on the operator’s setup of the Minimate Plus) in intervals, unlike the real time continuous method used in the other record modes. This mode reduces the data recorded and increase the monitor’s recording time. The monitor samples data continuously at the chosen sample rate but only stores the relevant peaks for the interval. For each interval, the monitor calculates the maximum positive and negative peaks, the frequency of the largest peak, and up to two peak vector sums (one with four channel monitors, two with eight channel monitors). For each channel, the maximum peak, its frequency, and the largest peak vector sum is calculated over the entire event.
Note: The extended nature of recording in the histogram mode consumes more battery power than other modes. Therefore, it is recommended to connect the MiniMate Plus to its AC adapter or an external 12 VDC power supply.
5) Histogram Combo Record Mode:
This mode creates a waveform during histogram recording if the signal exceeds the waveform trigger level. The waveform event is saved as a separate file while the histogram event file remains continuous. Up to 13 waveform events can be stored, without resetting the Minimate Plus. Each time the Minimate Plus is turned and set to Combo Mode, the console configures itself to record 13 waveform events. The previously stored waveforms will be retained by the MiniMate Plus’s memory.
The auxiliary trigger is disabled during histogram combo mode. The maximum sample rates in this mode are as follows:
a. 4 channels or less: 2048 samples per second
b. more than 4 channels: 1024 samples per second
Note: The extended nature of recording in the histogram mode consumes more battery power than other modes. Therefore, it is recommended to connect the MiniMate Plus to its AC adapter or an external 12 VDC power supply.
To select a MiniMate Plus Record Mode:
Press the Setups key. Press the Enter key to display the Recording Mode window. Press the ↑ key or → key to scroll through the record. Press the Enter key to select a record mode when it appears on the display.
MiniMate Plus Record Stop Modes:
1) Single Shot, Continuous, or Manual modes:
Fixed or Auto record stop modes are used with single shot, continuous or manual record modes. If you are not recording in one of these modes, you can stop reading now. The Fixed setting records for a specific amount of time after a trigger level is met. It is important to set a fixed time long enough that it captures a full event but does not waste precious memory. Once the record time has elapsed, the MiniMate Plus stops recording. In the Auto setting, activity is recorded as long as it remains above the trigger level and there is sufficient memory/battery power.
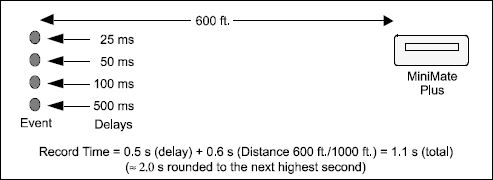
When setting a Fixed record time for a blast event, a helpful rule of thumb is to add the delays between detonating holes or use the longest delay, then add one second for each one thousand feet (300 m) from the event to the MiniMate Plus to account for the speed of sound. For example, in the figure below the minimum record time required is 1.1 seconds. To be on the safe side and ensure you record all the event’s activity, set the record time to 2.0 seconds. There is no single method for setting a record time. Use your knowledge and experience to determine a record time.

The total record time available depends upon the amount of available memory. The MiniMate Plus checks your setup to determine the amount of available memory. If there is not enough memory, a warning message appears and the record time defaults to the maximum available.
To set the Record Stop mode, press the Setups key when the Main window is displayed. Press the Enter key to scroll though the windows until the Record Stop Mode window appears. Press the ↑ key to display either the Fixed setting or the Auto setting. Press the Enter key to save your setting when it appears in the display.
2) Histogram Interval (Histogram and Histogram Combo Modes):
In histogram and histogram combo record modes, the interval menu will be displayed instead of the record stop mode menu. The histogram interval is the period of time the monitor records event information before applying the data analysis techniques. For each interval, the monitor calculates the maximum positive and negative peaks, the frequency of the largest peak, and up to two peak vector sums (one with four channel monitors, two with eight channel monitors). For each channel, the maximum peak, its frequency, and the largest peak vector sum is calculated over the entire event.
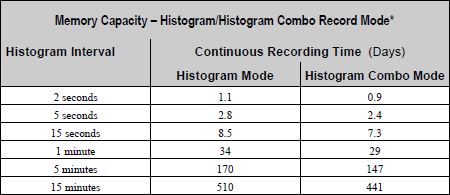
The following table lists approximate recording times for the various histogram intervals. The table assumes 300 event (960 kB) available memory and sufficient power supplied to the monitor during recording. As an approximation, if you increase the monitor’s event memory to three megabytes, the values increase by a factor of three. If the monitor’s memory is five megabytes, the values increase by an approximate factor of five. Increasing the sample rate to 2048 samples per second has no effect. If the recording channels increase to eight, the values decrease by approximately one half. Memory Capacity – Histogram/Histogram Combo Record Mode*

* Sufficient power must be supplied to the monitor.
Increasing the Recording Time
Recording time can increased by turning off either the geophone or microphone channels or by using the timer when this data is not needed. Turning off the geophone channels increases the record time by 80% while turning off the microphone channel increases the recording time by 20%. Using the timer can increase the recording time by recording only those time periods when events occur. For example, setting the timer to record for eight hour days only, increases the histogram record time by three times.
To set the histogram interval, ensure you have chosen the histogram record mode. Press the Setups key when the Main window is displayed. Press the Enter key repeatedly until the Histogram Interval window appears. Press the ↑ key or → key to select an interval. The available intervals are 2, 5, and 15 seconds and 1, 5, and 15 minutes. Press the Enter key to save your setting.
Note: When exiting the histogram record mode, the last incomplete interval may not be saved. If the password feature is enabled, the last few intervals may not be saved.