1) Connect the Vibration Monitor to Your Computer:
Turn off the power to your ground vibration monitor and connect it to your computer. Using the Serial Cable (and the USB to Serial Adaptor if needed), attach the ground vibration monitor to the computer. Do not force the connectors, possible damage may result. For directions on how to connect the USB Adaptor to the serial cable and computer, visit USB Adaptor Use. When using the USB Adaptor, you will have to install its driver.

2) Start the Blastware Program:
Turn on your computer and open the Blastware program. Click on the Windows Start button in the lower left of the screen, select Programs, and then Blastware. Click on the Blastware icon to start the Blastware program. Blastware’s main menu will appear. In the lower-left corner, select the Series III checkbox to ensure that Blastware is compatible with the ground vibration monitor.
3) Set up Communications:
Communication between a ground vibration monitor and your computer is configured using the Communications Setup menu located under the Unit drop-bar. Open the Unit drop-bar and choose Communications:

Adjust the Port dropbar menu to establish communication between the computer and the ground vibration monitor. The Port refers to your computer’s serial connection. We need to match the Port drop-bar menu to the number of the serial port. There are Port options 1 to 20. Identify the serial port on your computer and choose the same number in the Port drop–bar menu. Begin with 1 and press the Test Connections button. If the communication link is unsuccessful, systematically select the next Port option until a link is made. Once successful, click the Close button to save the settings and exit the Communications Setup menu.
It is important to note that the ground vibration monitor’s Serial Connection must be set to Direct. Also, the Baud Rate in the Communication Setup menu must match the Baud Rate programmed into the ground vibration monitor. Change these preferences.

4) Check the Unit Status:
To check important information about the ground vibration monitor, click the Unit menu and select the Status command to display the Status menu.

This menu will provide information about the ground vibration monitor such as such its operating software version, when and by whom it was calibrated, the current set date and time, the current mode the monitor is in, its battery level, the amount of total memory installed in the monitor, and the amount the memory available.
5) Report Options:
Blastware creates an Event Summary Report for each recorded event by entering a new report title, choosing a Compliance Report, and the reports measurement units.
1. Open the Report Options menu by clicking on the icon, or access it from the File menu.
2. Change the Report Title to a title of your choice by positioning the cursor in the Report Title text box. Delete the existing title and enter a new title (49 character maximum).

3. Choose a Compliance Graph by clicking the Compliance Graph drop-bar menu. A list of compliance graphs appear. Scroll through the list and choose a supported compliance report. If you have two geophones attached, then repeat this step for the second geophone.
4. Press the OK button to close the dialog box and save your changes.
6) Copy All the Events to Your Computer:
To copy ground vibration monitor events to your computer, press the Copy/Print icon to display the Copy and Print All Events menu, downloading ground vibration monitor events. Click the Yes button to copy all the ground vibration monitor events on the unit, and display them in the Events list box. Check the Print box to print the events on your computer’s printer.

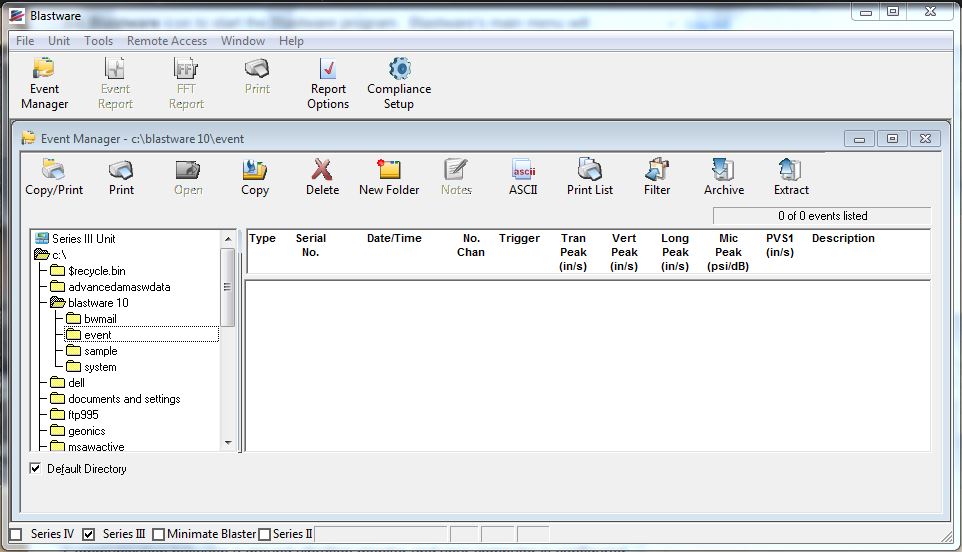
7) Open the Event Manager:
The Event Manager organizes the ground vibration monitor events stored on your computer similar to the Windows File Manager. The Event Manager allows you to copy, delete, print, and view events by simply selecting an event and pressing the appropriate command button. If the Event Manager is not open, click the on the File Menu and then click on the Event Manager button. The Event Manager menu appears for use.
8) View an Event Report:
You can view an Event or FFT Report by clicking on the Event Report or FFT Report icons provided in the toolbar. These reports can also be accessed by pre-selecting them under the Window menu, then Auto Open – select the reports you would like to view automatically by highlighting them with a check mark. The default is both reports. To automatically view reports using the Auto Open selections, double-click the desired event, and the reports will be created in a new window based on the settings you have defined in the Report Options menu within the File menu.

1. The computer display settings (i.e. 800 x 600) will determine to what extent you will be able to view the ground vibration monitor events without scrolling. Scroll through the Event Report to fully view it.
2. After viewing the entire event, click on the File menu and choose the Print Preview command. A preview displaying the entire Event Report will appear on your display.
3. Add Post Event Notes by clicking on the Tools menu one and selecting the Post Event Notes command. Enter your comments and press the Apply to Event button.
4. Print the Event by either clicking on File Menu and selecting the Print command, or use the Print icon available in the toolbar. If required, adjust the settings in the Printer menu and press OK or Yes to send the print job to your default printer.
